


Origami Kissing Lips
Pucker up! Once you're done folding this origami kissing lips, you'll be ready to kiss anyone on Valentine's Day or any other day! There's a video of the origami kissing lips in action at the end of this page.
Made this origami? Comment and Submit your photo using the comment box at the end of this page!
This is a really fun action origami toy so fold it and have lots of fun with it!
Origami Kissing Lips Step 1: Start with a 6 inch x 6 inch (15cm x15cm) square origami paper, color side down.

Origami Kissing Lips Step 2: Fold in half. Crease well and unfold.


Origami Kissing Lips Step 3: Now fold both sides to the center. Crease well and unfold.


Origami Kissing Lips Step 4: Now fold the paper in half by making a mountain fold. This means that the top half of the paper should end up under the bottom half of the paper.
Please refer to our page on valley and mountain folds if you're not clear as to what they are.


Origami Kissing Lips Step 5: Make 2 diagonal folds on the right and left corners as shown below.


Origami Kissing Lips Step 6: Now make 2 more folds on the right and left corners as indicated below. Crease well and unfold.


Origami Kissing Lips Step 7: The next step is to make an inside reverse fold on each side. This is a commonly used fold in origami. It can get complicated sometimes but here it is easy.
You can see that I've indicated mountain folds on both corners in the photo below.

The easiest way to do this is to pry open the paper slightly...

...and press down the tip so that it stays tucked in between the 2 sides of paper.


Origami Kissing Lips Step 8: Now we repeat Step 7 on the left side.

Once again, pry open the paper...

push the tip down and close the paper back up.


Origami Kissing Lips Step 9: OK, after we go through all that effort to make this fold and that fold, what do we do next?
We open the paper back up!

Origami Kissing Lips Step 10: Fold both sides to meet in the center.


Origami Kissing Lips Step 11: Now fold the paper in half as indicated below. Crease well and unfold.


Origami Kissing Lips Step 12: Rotate the paper so that it is horizontal. Let's zoom into the center. You can see the outline of your lips already, right?

To make the lips move, we need to make sure that the folds are correct, namely the valley and mountain folds.
The outer folds should be valley folds while the inner folds should be mountain folds. You can "pinch" the paper the make the mountain folds.

If you've done it properly, your red lips should now look like the picture below. See the valley and mountain folds?

A closer look.... see how by making the valley and mountain folds, your lips are "raised"?

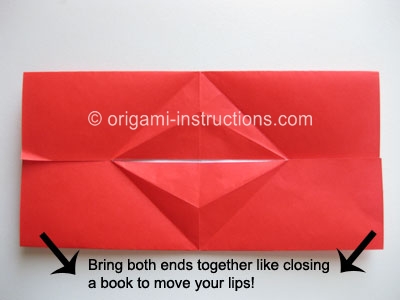
Origami Kissing Lips Step 13: Your origami kissing lips is complete! Put it to good use. Bring both ends together like you're closing a book and your lips will open and close!
And here's a video of the origami kissing lips in action!